Convolution is a process used for applying general-purpose filter effects like blurring, sharpening, embossing, edge detection, and more.
To understand convolutions we must first understand what a convolution matrix is, also referred to as kernel. Take for example the blurring filter. In blur filter, we set each pixel to the mean of its neighbouring pixels. Take a look at the below averaging operation. We replaced 227 with 225.

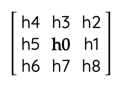
This is a simple blur filter. We repeat this for all pixels in the image. For corner pixels, we either ignore it or use the immediate neighbour pixels. The matrix representation of each 3×3 window on which we apply our filter looks like:
The blur operation can be represented as
h0 = (h0 + h1 + h2 + h3 + h4 + h5 + h6 + h7 + h8 ) / 9
Now if we were to represent the above operation using a matrix, we would get the below representation:

What happened above is, we multiplied each pixel to its corresponding pixel (which in this case is 1/9) in the convolution matrix, then summed it up to get the value of the centre pixel. This process is called Convolution represented by the symbol * with a circle around it. The second matrix is called a kernel, mask or a convolution matrix.
The above convolution operation can be represented mathematically as below:
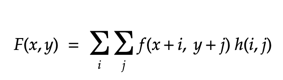
where, F(x,y) is the output image, f(x,y) is the original image, h(i,j) is the kernal.
The below code perform convolutions in python.
import numpy as np
from scipy.ndimage.filters import convolve

a = np.array([[228, 227, 222],[228, 227, 222],[228, 227, 222]])
b = np.array([[1/9, 1/9, 1/9],[1/9, 1/9, 1/9],[1/9, 1/9, 1/9]])

print(convolve(a, b))

--------

#the output would be like
array([[227, 225, 223],
       [227, 225, 223],
       [227, 225, 223]])

#the corner pixels used only 4 or 6 pixels.
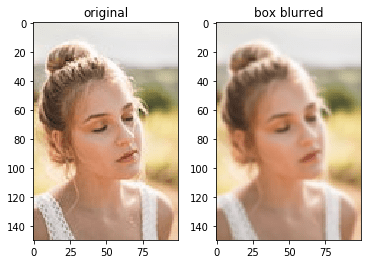
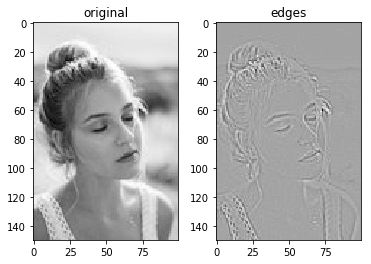
For coloured images, we perform convolution on each colour space separately and then merge them together. Applying the blurring convolution on a full image we get the below result.
The code used for the above processing is:
import matplotlib.pyplot as plt
import numpy as np

from skimage.io import imread
from scipy.ndimage.filters import convolve

img = imread("beautiful-woman.jpg")

box_blur_kernel = np.array([[1/9, 1/9, 1/9],
                            [1/9, 1/9, 1/9],
                            [1/9, 1/9, 1/9]])

image_copy = img.copy()
image_copy[:,:,0] = convolve(image_copy[:,:,0], box_blur_kernel)
image_copy[:,:,1] = convolve(image_copy[:,:,1], box_blur_kernel)
image_copy[:,:,2] = convolve(image_copy[:,:,2], box_blur_kernel)

fig, ax = plt.subplots(ncols=2)
ax[0].set_title("original")
ax[0].imshow(img)
ax[1].set_title("box blurred")
ax[1].imshow(image_copy)
There are many other kernels for various image processing operations.
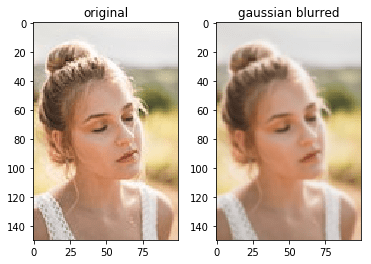
Gaussian blur
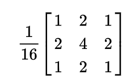 |
 |
Edge detection
This one will require the image to converted to grayscale first before convolution.
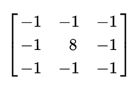 |
 |
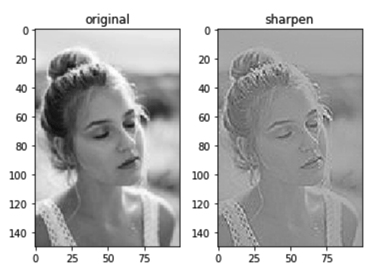
Sharpen image
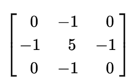 |
 |
Emboss Image
 |
 |
References:
- https://en.wikipedia.org/wiki/Kernel_(image_processing)
- https://en.wikipedia.org/wiki/Gaussian_blur
Sample Image:
- https://www.pexels.com/photo/close-up-photo-of-woman-with-her-eyes-closed-2351707/